Kuvatud on postitused sildiga pall. Kuva kõik postitused

neljapäev, 28. juuli 2011

Jalgpall

Knitted Soccer Ball


In total, you’ll have to make 20 hexagons and 12 pentagons. Don’t worry, though, each one takes about ten minutes, tops! It uses up less than a ball of yarn for each colour so it’s a perfect stash-buster, and if you knit it in your national colours, it’s patriotic, too!

Size:

Slightly smaller than a regulation soccer ball

Materials:

2 or 3 balls of worsted weight yarn, depending on your colour scheme. Allow one ball for each colour you use. If you plan to play with the soccer ball, make it a washable yarn; probably acrylic.
5mm double-pointed needles
place markers
tapestry needle
stuffing or inflatable beach ball

Gauge:

28 stitches and 36 rows to 4 inches.

Pattern Notes:

The complexity of this pattern is in keeping track of where to put the pentagons and hexagons. It’s really easy if you just remember that making a soccer ball is like making lots of little daisies. Some daisies will share petals (the hexagons), but you’ll never see two pentagons side-by-side.

I found it easier to pick up stitches and add panels straight onto the ball than to make them all individually and seam them together. If you just want to stitch it all together, more power to ya; it’s easier to block that way, but remember that you’ll be blocking 32 individual pieces.

The following diagram is a rough guide to constructing your ball. The coloured lines mean the edges are meant to connect.
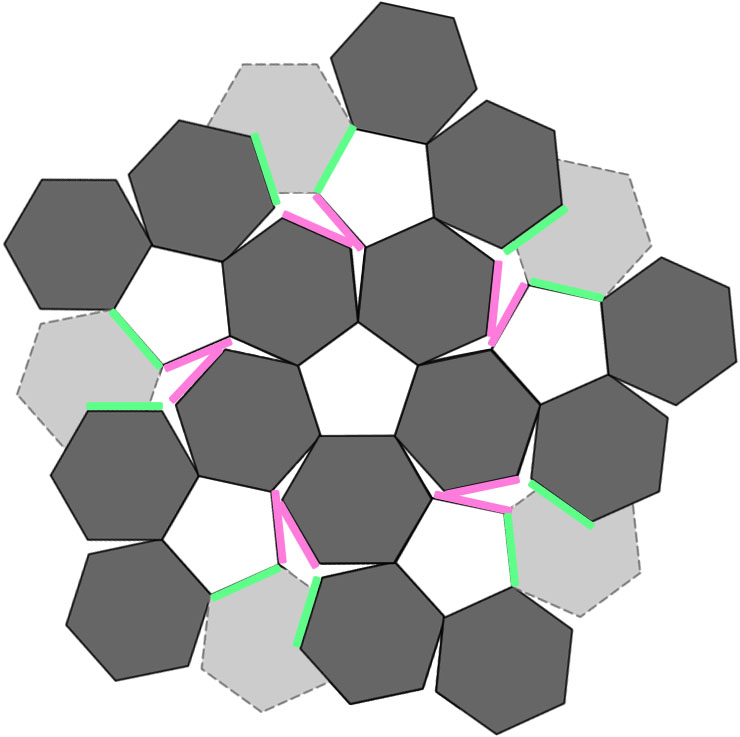
Soccer Ball Construction Diagram

Continue as above, keeping to the rule that every pentagon is loosely encircled by five other pentagons.

To make a Pentagon:

Cast on 25 stitches using a Twisted German cast on, a long tail cast on (or any other stiff cast on) and join in the round.

Row 1: * K3, K2tog, place marker, repeat from * until end of row.
Rows 2 – 4: * Knit until 2 stitches before marker, K2tog, pm, repeat from * until end of row.

Feed yarn through remaining stitches (there should be 5 of them) and tie off.

To make a Hexagon:

Cast on 30 stitches and join in the round.

The instructions for the hexagon are exactly the same as for the pentagon, except you’ll be doing everything 6 times per row instead of 5 times per row.

Row 1: * K3, K2tog, place marker, repeat from * until end of row.
Rows 2 – 4: * Knit until 2 stitches before marker, K2tog, pm, repeat from * until end of row.

To bind off, feed your yarn through the remaining stitches (there should be 6 of them this time) and tie off.

Picking up stitches:

If you don’t want to knit, block and sew together 32 panels (like me), you can pick up stitches from previous panels and build onto them. I usually made a ring of 5 hexagons and then picked up 25 stitches from the ring in the middle to complete the “daisy.” All you have to keep in mind is that there are 5 stitches to a side, so if you’re adding a hexagon to the side of another, cast on 25 stitches and then pick up 5 stitches to make 30 stitches in total. If you’re adding a hexagon onto two side-by-side hexagons, cast on 20 stitches and then pick up 5 stitches from each hexagon. If you’re adding a hexagon between two hexagons, it gets a bit complicated; cast on 15 stitches, pick up 5 from the first hexagon (carrying the tail along behind the work), cast on 5 more stitches, and then pick up a final 5 stitches to make 30 in total.

Finishing

When you’re one or two panels away from finishing, the stuffing / blocking begins. If you’re going to stuff your ball, shove a few rags into it and stretch it to however large you want it. Dampen it and let it dry. If you want to actually play soccer with it, you can put in a small inflatable beach ball or some sort of expensive soccer ball bladder, but I have no idea about those.

So you have access to the nipple (hee hee) of the beach ball, knit the last panel (a pentagon in this case) like so:

Pick up or cast on 25 stitches.

Row 1: * K3, K2tog, place marker, repeat from * until end of row.
Rows 2 – 3: * Knit until 2 stitches before marker, K2tog, pm, repeat from * until end of row.

Cast off tightly. The nipple will just poke out. If you want, you can slip the nipple cover under and through the cast-off edge to hold it in place. Inflate the ball, dampen it and let dry.

Your soccer ball is done! Great job!

http://needle-exchange.ca/2006/06/11/world-cup-soccer-ball-knitting-pattern/

Pall

Alphabet Ball

Fun little ball helps babies learn their ABCs while exercising.

MEASUREMENT
3¾ ins [9.5 cm] diameter

MATERIALS
Patons Canadiana
(100 g/3.5 oz) or
Patons Décor
(100 g/3.5 oz)
Main Color (MC) (Purple) 1 ball
Contrast A (Yellow) 1 ball

Size 3.75 mm (U.S. 5) knitting needles or size needed to obtain tension. Stuffing.

TENSION
24 sts and 32 rows = 4 ins [10 cm] in stocking st.

INSTRUCTIONS
Note
: When working separate areas of color in the design, wind small balls of the colors to be used. Start new colors at appropriate points. To change colors, twist the two colors around each other where they meet, on WS, to avoid a hole.
*With MC, cast on 1 st. With A, cast on 1 st. Rep from * twice more. 6 sts.
1st row: (RS). With A, (K1. yfwd. K1) all in first st. *With MC, (K1. yfwd. K1) all in next st. With A, (K1. yfwd. K1) all in next st. Rep from * once more. With MC, (K1. yfwd. K1) all in next st. 18 sts.
2nd row: *With MC, (inc 1 st in next st) twice. P1. With A, (inc 1 st in next st) twice. P1. Rep from * twice more. 30 sts.
3rd row: With A, inc 1 st in first st. K2. Inc 1 st in next st. K1. *With MC, inc 1 st in next st. K2. Inc 1 st in next st. K1. With A, inc 1 st in next st. K2. Inc 1 st in next st. K1. Rep from * once more. With MC, inc 1 st in next st. K2. Inc 1 st in next st. K1. 42 sts.
4th row: *With MC, P7. With A, P7. Rep from * twice more.
5th row: With A, inc 1 st in first st. K4. Inc 1 st in next st. K1. *With MC, inc 1 st in next st. K4. Inc 1 st in next st. K1. With A, inc 1 st in next st. K4. Inc 1 st in next st. K1. Rep from * once more. With MC, inc 1 st in next st. K4. Inc 1 st in next st. K1. 54 sts.
6th row: *With MC, P9. With A, P9. Rep from * twice more.
7th row: *With A, K9. With MC, K9. Rep from * twice more.
8th row: As 6th row.
9th row: With A, inc 1 st in first st. K6. Inc 1 st in next st. K1. *With MC, inc 1 st in next st. K6. Inc 1 st in next st. K1. With A, inc 1 st in next st. K6. Inc 1 st in next st. K1. Rep from * once more. With MC, inc 1 st in next st. K6. Inc 1 st in next st. K1. 66 sts.
10th row: *With MC, P11. With A, P11. Rep from * twice more.
11th row: *With A, K11. With MC, K11. Rep from * twice more.
12th and 13th rows: As 10th and 11th rows.
14th row: As 10th row.
15th row: With A, inc 1 st in first st. K8. Inc 1 st in next st. K1. *With MC, inc 1 st in next st. K8. Inc 1 st in next st. K1. With A, inc 1 st in next st. K8. Inc 1 st in next st. K1. Rep from * once more. With MC, inc 1 st in next st. K8. Inc 1 st in next st. K1. 78 sts.
16th row: *With MC, P13. With A, P13. Rep from * twice more.
17th row: *With A, K13. With MC, K13. Rep from * twice more.
18th to 25th rows: As 16th and 17th rows 4 times.
26th row: As 16th row.
27th row: *With A, Sl1. K1. psso. K9. K2tog. With MC, Sl1. K1. psso. K9. K2tog. Rep from * twice more. 66 sts.
28th to 31st rows: As 10th and 11th rows twice.
32nd row: As 10th row.
33rd row: *With A, Sl1. K1. psso. K7. K2tog. With MC, Sl1. K1. psso. K7. K2tog. Rep from * twice more. 54 sts.
34th and 35th rows: As 6th and 7th rows.
36th row: As 6th row.
37th row: *With A, Sl1. K1. psso. K5. K2tog. With MC, Sl1. K1. psso. K5. K2tog. Rep from * twice more. 42 sts.
38th row: As 4th row.
39th row: *With A, Sl1. K1. psso. K3. K2tog. With MC, Sl1. K1. psso. K3. K2tog. Rep from * twice more. 30 sts.
40th row: *With MC, P2tog. P1. P2togtbl. With A, P2tog. P1. P2togtbl. Rep from * twice more. 18 sts.
41st row: *With A, Sl1. K2tog. psso. With MC, Sl1. K2tog. psso. Rep from * twice more. 6 sts. Break yarn leaving a long end and thread through rem sts. Fasten securely.
With opposite color, duplicate st letters in sequence as shown below.
Sew side seam, leave 3 ins [7.5 cm] open for stuffing. Stuff ball firmly. Sew opening closed.

http://www.patonsyarns.com/pattern.php?PID=4260&cps=21191

Pall

Judy's 12-Section Yarnball

Photo of yarnball This garter stitch ball is about 4 or 4.5 inches in diameter -- about the size of a grapefruit -- and is shaped by short rows. It's a good for using up odds and ends of yarns of different colors. Each section takes about 4 yards of yarn.

Please notice that although I describe this ball as being knitted in "sections," the sections are not separate pieces, just one color wedge after another! The photos of the in-progress yarnballs show what I mean.

Materials

4-ply (worsted weight) knitting yarn, one or two or more colors
Pair of #4 (US) needles
Polyester fiber filling or old nylon stockings or other stuffing

Note that the needles are small for the size of the yarn. This makes a dense fabric so the filling won't show through.

Cast on 28 stitches.

Instructions for one section

Row 1: turn [pick up or attach new color if you're going to change] and knit 28 stitches
Row 2: turn and knit 20 stitches
Row 3: turn and knit 18 stitches
Rows 4, 6, 8, and 10: repeat row 2
Rows 5, 7, and 9: repeat row 3
(In other words, each row takes you two stitches closer to the top.)

Repeat rows 1 through 10 until you have made 12 sections, one after the other.

Each section starts at same end; I call this the "top". (Don't cut off the old yarn; it will be there waiting for you when you start the next section in that color.)

Bind off when you get to the end of the last section. Leave about a 12" tail to use for sewing up. Notice that since this is garter stitch, on one side there is a sharp boundary between the colors of the adjacent wedges, and on the other side the adjoining colors are interlinked. Decide which side you want to be the outside.

With a tapestry needle, run the tail around through the end stitches of the rows and pull tight. (To make it extra firm, run the yarn around again.) Continue sewing up the open side about 2/3 of the way.

Stuff the ball as firmly as you like and sew up the rest of the way. Run the yarn through the end stitches of the rows (twice if you like) and pull tight. Make a knot and run the end of the yarn into the ball and cut off.

Hint: If you're going to use the "inside" as the side that shows (that is, the side where the colors of adjoining segments interlock), knit one last row in the color of the section you will be stitching to, then cast off. This will give you the last set of interlocking stitches, and let you sew together two edges that match in color.

Now here's an attempt at charting how this pattern works. Each dash and arrowhead is one stitch. Cast on 28 stitches, and knit as follows:

 "Top" end of ball
/
- - - - - - - - - - - - - - - - - - - - - - - - - - - >
< - - - - - - - - - - - - - - - - - - -
- - - - - - - - - - - - - - - - - >
< - - - - - - - - - - - - - - - - - - -
- - - - - - - - - - - - - - - - - >
< - - - - - - - - - - - - - - - - - - -
- - - - - - - - - - - - - - - - - >
< - - - - - - - - - - - - - - - - - - -
- - - - - - - - - - - - - - - - - >
< - - - - - - - - - - - - - - - - - - -

Make 12 sections and bind off, leaving a long tail. Sew up and stuff the ball.

Bonus: A Small Yarnball

This one is a lot smaller. Keeping to my citrus theme, it's about the size of a tangerine (or a hackysack), 2 to 2 1/2 inches in diameter.

Cast on 17 stitches
Make first section, as follows:
Row 1: turn and knit to the end
Row 2: turn and knit 12 sts, leaving 5 on the needle
row 3: turn and knit 7 sts, leaving 5 on the needle
Row 4: turn and knit 10 sts, leaving 2 on the needle
Row 5: turn and knit 13 sts, leaving 2 on the needle
row 6: turn and knit to the end
Row 7: turn and knit to the end
Row 8: turn and knit to the end
(you're back at the top)
Repeat rows 1 to 8 until you have completed ten sections.
Bind off, sew and stuff.

   - - - - - - - - - - - - - - - - >
< - - - - - - - - - - -
- - - - - - >
< - - - - - - - - -
- - - - - - - - - - - - >
< - - - - - - - - - - - - - -
- - - - - - - - - - - - - - - - >
< - - - - - - - - - - - - - - - -
http://tiajudy.com/yarnball.htm

kolmapäev, 27. juuli 2011

Kiisu palliga

Игрушка - Белый котенок

Высота 12 см
Вам потребуется:
30 г. толстой п/ш пряжи натурального белого цвета, немного розовой пряжи;
синтепон для набивки;
глазки;
крючок №3,5.

Котенок

Котенок вяжется по кругу ст. б/н. В процессе вязания набивайте детали синтепоном.

Туловище: свяжите 4 возд, п., замкните в кольцо. Вяжите ст. б/н, увеличив за 14 рядов количество столбиков до 36. далее вяжите лапы: свяжите 8 возд. п. и вяжите ст. б/н с противоположной стороны, т.е. делим круг по­полам. На каждом полукруге должны расположиться 2 лапы. Для этого провяжите половину полукруга, сделайте 4 возд. п. и вяжите ст. б/н с противоположной стороны. Таким образом мы разделили круг пополам и начали вязать первую лапку. Ширина лапы -16 ст., высота — 7 рядов. В 8-м ряду с передней стороны прибавьте 3 ст. б/н, свяжите еще 1 ряд, затем розовой нитью довяжите ступню, делая убавки. Так же свяжите остальные лапы.

Голова: вяжите круг шириной 28 ст., высотой 11 рядов.

Хвост: свяжите цепочку из 5 возд. п. Вяжите 15 рядов, постепенно увеличивая количество столбиков до 9.

Уши (4 детали): вяжите по схеме 1.

Мордочка: вяжите по схеме.

Сборка: соедините все детали. Пришейте глазки. Черной нитью вышейте носик, ротик и коготки на лапках.
Игрушка - Белый котенок


Мячик

Вам потребуется:
пряжа «Ирис» (100% хлопок) — 12 разноцветных нитей;
крючок №1,75;
наполнитель.

Для одного сектора наберите 3 возд, п., сомкните в кольцо. В центр ввяжите 10 ст. б/н. Далее вяжите столбиками б/н, прибавляя петли в каждом ряду в 5 местах, чтобы получился пятиугольник. Свяжите 12 разноцветных деталей, сшейте их между собой, набейте синтепоном. Внутрь можно вставить контейнер из «Киндер-сюрприза», предварительно наполнив его мелкими шариками или крупой. Получится погремушка.
Kiisuke koos palliga tulid siit: http://vse-sama.ru/igrushki-suveniry/igrushka-belyj-kotenok.html